In this tutorial, we’ll deploy (self-host) n8n on the Oracle Cloud Infrastructure (OCI) for free – using Docker Compose for quick setup (n8n and PostgreSQL), Nginx as the web server, and Cloudflare for SSL protection.
What you will need
- A free OCI account.
- A domain (for example, let’s say you will deploy at
https://n8n.your-domain.com). - A Cloudflare account.
In summary, we’ll create an Instance (server) on OCI, install the required stack (Docker Compose, PostgreSQL, Nginx), set up SSL, and then install n8n.
Create a free OCI account
Go to this address: https://www.oracle.com/cloud/free/. Click the Start for free button and complete the steps to create an account.
OCI provides two types of account:
- Always Free: Free for limited services and resources with no time limit.
- Pay As You Go (PAYG): Metered, usage-based billing for any services consumed, with no upfront commitment or minimum service period.
When you create a new OCI account, you’re given an Always Free account. This type of account often runs into issues when creating new instances because the resources allocated to Free accounts are limited.
The solution is to upgrade your account to the PAYG type. Don’t worry — you won’t be charged as long as you stay within the Free Tier limits, which are: 4 OCPUs, 24 GB of RAM, and 200 GB of block storage. For detailed instructions, see the official document on how to upgrade to PAYG. This article will guide you through using only the Always Free resources.
Create a new Instance in OCI
To launch a new Instance, follow these steps:
- Sign in to your Oracle dashboard.
- Click the top-left burger icon → Search for “Instances” and click on it to open.
- Click the Create instance button.
In the new window, let’s input this information:
- Name: Your Instance name, can be anything, e.g.
n8n-prod-2025. - Create in compartment: Leave as default.
- Placement: Leave as default.
- Image and Shape:
- Image: Click the Change image button → Choose Ubuntu → Choose
Canonical Ubuntu 24.04as the operating system (notice it is labeled asFree) → Click Select image. - Shape: Click the Change shape button → Choose Ampere → Choose
VM.Standard.A1.Flex (Always Free-eligible)as the processor. - Click the small arrow icon before the shape name to select the number of OCPUs and the amount of memory. You can choose between 1 – 4 OCPUs and 1 – 24GB of RAM, with a maximum of 6GB of RAM per OCPU. For example, if you choose 1 OCPU, the maximum RAM is 6GB; 2 OCPUs allow up to 12GB, and so on. Keep in mind that the total OCPUs and RAM across all your Instances must stay within the Free Tier limits to avoid charges.
- For n8n, 1 OCPU with 6GB RAM is enough.
- Image: Click the Change image button → Choose Ubuntu → Choose
- Click the Next button to continue to Security tab:
- Shielded instance: DISABLE / OFF.
- Click the Next button to continue to Networking tab and scroll down to the Add SSH keys part:
- Choose Generate a key pair for me → Press the Download private key button to download the file. Keep this file in private and don’t share with anyone. You will need this file to SSH to your server later.
- Click the Next button to continue to Storage tab:
- Enable this option under Boot volume: “Specify a custom boot volume size and performance setting”.
- Choose the Boot volume size, this is the storage of your server, you can set it anywhere between 50GB and 200GB. Keep in mind that the 200GB free-tier limit applies to the total storage across all your instances.
- For the Boot volume performance, you can leave it as default (
10).
Click Next to open the Review tab. Check all your settings carefully, then click Create to launch your instance. After a few minutes, your new instance will appear in the Instances list and ready for you to use.
Set up Ports for Connectivity
By default, all the ports of your newly-created Instance are closed. You need to open some ports so that you can access n8n editor later.
To open ports, go to Instances → Click on your Instance → Switch to Networking tab → Click on the item in the Subnet row → Then switch to Security tab → Click on the item inside the Security Lists → Then switch to Security rules tab.
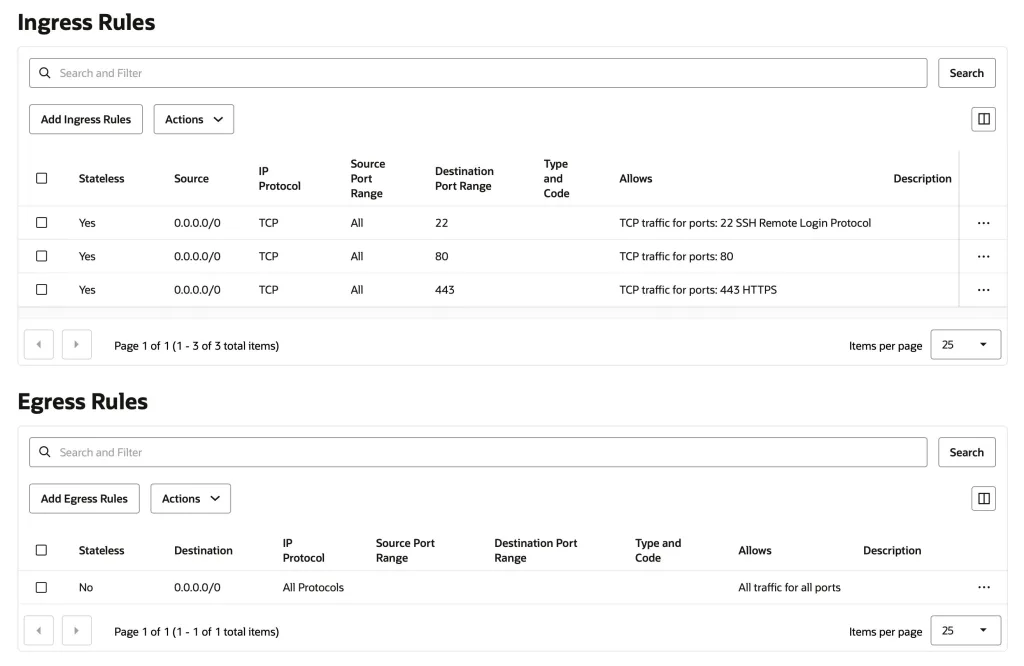
From there, in the Ingress Rules section, press Add Ingress Rules button:
- Stateless:
ENABLE - Source Type:
CIDR - Source CIDR:
0.0.0.0/0 - IP Protocol:
TCP - Destination Port Range:
22,80,443
Set up the DNS
Now you have your new Instance, let’s point your domain or sub-domain to it. In the Instances dashboard, you can see the Public IP of each Instance. Use your DNS manager (in this case is Cloudflare) to point to this IP.
Install Docker & Docker-Compose
SSH to your server and use these commands in turn:
sudo apt install -y ca-certificates curl gnupg lsb-release

sudo install -m 0755 -d /etc/apt/keyrings

curl -fsSL https://download.docker.com/linux/ubuntu/gpg | sudo gpg --dearmor -o /etc/apt/keyrings/docker.gpg

echo \
  "deb [arch=$(dpkg --print-architecture) signed-by=/etc/apt/keyrings/docker.gpg] https://download.docker.com/linux/ubuntu \
  $(lsb_release -cs) stable" | sudo tee /etc/apt/sources.list.d/docker.list > /dev/null

sudo apt update -y
sudo apt install -y docker-ce docker-ce-cli containerd.io docker-buildx-plugin docker-compose-plugin

sudo systemctl start docker
sudo systemctl enable docker
Code language: plaintext (plaintext)
Add user ubuntu to the docker group:
sudo usermod -aG docker ubuntu
newgrp docker
Install & Configure Nginx
To install Nginx:
sudo apt install -y nginx
sudo systemctl start nginx
sudo systemctl enable nginx
Next, we’ll configure it. Create a config file for Nginx:
sudo nano /etc/nginx/sites-available/n8nAnd paste this content to that file (remember to place your exact domain or sub-domain in server_name):
server {
    listen 80;
    server_name n8n.your-domain.com;

    # Deny access to .env files
    location ~* \.env$ {
        deny all;
        return 403;
    }

    return 301 https://$host$request_uri;
}

server {
    listen 443 ssl;
    server_name n8n.your-domain.com;

    # Deny access to .env files
    location ~* \.env$ {
        deny all;
        return 403;
    }

    # Logs
    access_log /var/log/nginx/access.log;
    error_log /var/log/nginx/error.log;

    # SSL certificate
    ssl_certificate /etc/ssl/certs/cloudflare.pem;
    ssl_certificate_key /etc/ssl/private/cloudflare.key;

    # Proxy to n8n Docker container
    location / {
        proxy_pass http://localhost:5678;
        proxy_set_header Host $host;
        proxy_set_header X-Real-IP $remote_addr;
        proxy_set_header X-Forwarded-For $proxy_add_x_forwarded_for;
        proxy_set_header X-Forwarded-Proto $scheme;

        # WebSocket support for n8n
        proxy_http_version 1.1;
        proxy_set_header Upgrade $http_upgrade;
        proxy_set_header Connection "upgrade";
        proxy_buffering off;
    }
}
Code language: Nginx (nginx)
Create a symbolic link for the configuration file:
sudo ln -s /etc/nginx/sites-available/n8n /etc/nginx/sites-enabled/
sudo rm -f /etc/nginx/sites-enabled/default
Code language: Bash (bash)
In the above config file, there are two lines specify the SSL certificate:
ssl_certificate /etc/ssl/certs/cloudflare.pem;
ssl_certificate_key /etc/ssl/private/cloudflare.key;Code language: Nginx (nginx)
In order to have those files, follow this guide to set everything up before continuing to this article.
Check if the Nginx syntax is correct, then reload it:
sudo nginx -t
sudo systemctl reload nginx
Use Docker Compose to install n8n
Prepare the environment
In this part, we will begin to install n8n. First, let’s take a look at the directory structure:
/n8n/
├── .env
└── docker-compose.yml
We need to create a folder, n8n, to contain the app. And two files:
.env: Contains the credentials for Docker Compose.docker-compose.yml: Docker Compose’s file to run the deployment.
Create the directory and go to its location:
mkdir ~/n8n
cd ~/n8n
Create and open the .env file:
sudo nano .envCode language: Bash (bash)Paste this content to the file:
# PostgreSQL Settings
POSTGRES_DB=n8n-db
POSTGRES_USER=n8n-user
POSTGRES_PASSWORD=YOUR-STRONG-PASSWORD
POSTGRES_SCHEMA=public

# n8n Settings
DB_POSTGRESDB_DATABASE=n8n-db
DB_POSTGRESDB_USER=n8n-user
DB_POSTGRESDB_PASSWORD=YOUR-STRONG-PASSWORD (SAME-AS-ABOVE)
N8N_HOST=
WEBHOOK_URL=
GENERIC_TIMEZONE=
N8N_ENCRYPTION_KEY=
Code language: YAML (yaml)
And change these settings:
POSTGRES_PASSWORD: Place your password here.DB_POSTGRESDB_PASSWORD: The same password as above.N8N_HOST: Your URL for n8n, e.g.n8n.your-domain.comWEBHOOK_URL: Same as above, but withhttps://, e.g.https://n8n.your-domain.comGENERIC_TIMEZONE: Set your timezone. You can visit this site to get the TZ identifier name of your city and put it here, e.g.US/HawaiiN8N_ENCRYPTION_KEY: Use the below command to generate the random secret key for n8n, then paste to this line.
openssl rand -base64 24Press Ctrl + X, then press Y to close and save the file editor.
Secure the .env file:
sudo chown ubuntu:ubuntu .env
sudo chmod 600 .env
Code language: Bash (bash)
Set up docker-compose.yml file
Create and open the docker-compose.yml file:
sudo nano docker-compose.ymlCode language: Bash (bash)Paste this content to the file:
services:
  postgres:
    image: postgres:16
    restart: always
    env_file: .env
    environment:
      POSTGRES_DB: ${POSTGRES_DB}
      POSTGRES_USER: ${POSTGRES_USER}
      POSTGRES_PASSWORD: ${POSTGRES_PASSWORD}
    volumes:
      - ./pg_data:/var/lib/postgresql/data
    networks:
      - n8n-network
    healthcheck:
      test: ['CMD-SHELL', 'pg_isready -U ${POSTGRES_USER} -d ${POSTGRES_DB}']
      interval: 5s
      timeout: 5s
      retries: 5

  n8n:
    image: n8nio/n8n
    restart: always
    env_file: .env
    environment:
      DB_TYPE: postgresdb
      DB_POSTGRESDB_HOST: postgres
      DB_POSTGRESDB_PORT: 5432
      DB_POSTGRESDB_DATABASE: ${DB_POSTGRESDB_DATABASE}
      DB_POSTGRESDB_USER: ${DB_POSTGRESDB_USER}
      DB_POSTGRESDB_PASSWORD: ${DB_POSTGRESDB_PASSWORD}
      DB_POSTGRESDB_SCHEMA: public
      GENERIC_TIMEZONE: ${GENERIC_TIMEZONE}
      WEBHOOK_URL: ${WEBHOOK_URL}
      N8N_PROTOCOL: https
      N8N_HOST: ${N8N_HOST}
      N8N_ENCRYPTION_KEY: ${N8N_ENCRYPTION_KEY}
      N8N_RUNNERS_ENABLED: true
      N8N_ENFORCE_SETTINGS_FILE_PERMISSIONS: true
      N8N_PUSH_BACKEND: websocket
      N8N_SECURE_COOKIE: true
      N8N_TRUST_PROXY: true
      N8N_PROXY_HOPS: 1
    ports:
      - '127.0.0.1:5678:5678'
    volumes:
      - ./n8n_data:/home/node/.n8n
    networks:
      - n8n-network
    depends_on:
      postgres:
        condition: service_healthy

networks:
  n8n-network:
    driver: bridge
Code language: YAML (yaml)
Press Ctrl + X, then press Y to close and save the file editor.
Set Permissions for n8n Data Volume:
sudo mkdir ~/n8n/n8n_data
sudo chown -R 1000:1000 ~/n8n/n8n_data
Code language: Bash (bash)
Bypass Cache on Cloudflare
Earlier, we used Cloudflare to enable SSL for our n8n instance. By default, Cloudflare may cache your n8n site, which is not what we want. To prevent this, we need to create a Cache Rule in Cloudflare to bypass caching for n8n, as follows:
- Log in to your Cloudflare dashboard → Open your domain.
- On the left sidebar, click Caching → Cache Rules → Click Create rule button:
- Rule name:
n8n Cache Bypass - Choose
Custom filter expression:- Field:
Hostname - Operator:
equals - Value: your domain or sub-domain, e.g.
n8n.your-domain.com - Cache eligibility: choose
Bypass cache
- Field:
- Rule name:
- Click the Deploy button.
Start the n8n
Before starting n8n, you should reboot the server:
sudo rebootWait 1-2 minutes, then try SSH to your server again to ensure it has completed the reboot.
Then use this command to deploy n8n and PostgreSQL as we set up earlier:
sudo docker compose up -dWait for the process to complete running. Then you can access your n8n at https://n8n.your-domain.com.
Troubleshooting
If you can’t access your n8n via the browser, try opening the OCI ports from the terminal. This is a known issue of OCI. Use this command to allow all incoming traffic:
sudo iptables -I INPUT -j ACCEPTNext, use these commands in turn:
sudo su
iptables-save > /etc/iptables/rules.v4
exit
Code language: Shell Session (shell)
Try visiting your n8n URL again in the browser.
Done.