This is the first step in the series Self-Hosting WordPress from Scratch. Although the server in this article is used for installing WordPress, you can also use it for other purposes as well.
About Oracle Cloud Infrastructure
Oracle Cloud Infrastructure (OCI) is Oracle’s cloud computing platform, comparable to Amazon Web Services (AWS), Microsoft Azure, and Google Cloud Platform (GCP). OCI provides the core infrastructure — servers, databases, networking, and more — needed to build, run, and scale your WordPress website.
In addition, OCI offers a generous Free Tier program that lets you host your website for free with no time limits. You can read more about their Free Tier program and register here.
Launch a new Instance on OCI
An Instance is a server that will host your website. Before creating an Instance in OCI, there is something you should know. OCI provides two kinds of account:
- Always Free: Free for limited services and resources with no time limit.
- Pay As You Go (PAYG): Metered, usage-based billing for any services consumed, with no upfront commitment or minimum service period.
When you create a new OCI account, you’re given an Always Free account. This type of account often runs into issues when creating new instances because the resources allocated to Free accounts are limited.
The solution is to upgrade your account to the PAYG type. Don’t worry — you won’t be charged as long as you stay within the Free Tier limits, which are: 4 OCPUs, 24 GB of RAM, and 200 GB of block storage. For detailed instructions, see the official document on how to upgrade to PAYG. This article will guide you through using only the Always Free resources.
To launch a new Instance, follow these steps:
- Sign in to your Oracle dashboard.
- Click the top-left burger icon → Search for “Instances” and click on it to open.
- Click the Create instance button.
In the new window, let’s input this information:
- Name: Your Instance name, can be anything, but I suggest you do something like these for clarity:
blog-prod-2025,company-prod-2025, etc. - Create in compartment: Leave as default.
- Placement: Leave as default.
- Image and Shape:
- Image: Click the Change image button → Choose Ubuntu → Choose
Canonical Ubuntu 22.04orCanonical Ubuntu 24.04as the operating system (notice it is labeled asFree) → Click Select image. - Shape: Click the Change shape button → Choose Ampere → Choose
VM.Standard.A1.Flex (Always Free-eligible)as the processor. - Click the small arrow icon before the shape name to select the number of OCPUs and the amount of memory. You can choose between 1 – 4 OCPUs and 1 – 24GB of RAM, with a maximum of 6GB of RAM per OCPU. For example, if you choose 1 OCPU, the maximum RAM is 6GB; 2 OCPUs allow up to 12GB, and so on. Keep in mind that the total OCPUs and RAM across all your Instances must stay within the Free Tier limits to avoid charges.
- For a typical WordPress site, 1 OCPU with 2GB RAM is enough.
- Image: Click the Change image button → Choose Ubuntu → Choose
- Click the Next button to continue to Security tab:
- Shielded instance: DISABLE / OFF.
- Click the Next button to continue to Networking tab and scroll down to the Add SSH keys part:
- Choose Generate a key pair for me → Press the Download private key button to download the file. Keep this file in private and don’t share with anyone. You will need this file to SSH to your server later.
- Click the Next button to continue to Storage tab:
- Enable this option under Boot volume: “Specify a custom boot volume size and performance setting”.
- Choose the Boot volume size, this is the storage of your server, you can set it anywhere between 50GB and 200GB. Keep in mind that the 200GB free-tier limit applies to the total storage across all your instances.
- For the Boot volume performance, you can leave it as default (
10).
Click Next to open the Review tab. Check all your settings carefully, then click Create to launch your instance. After a few minutes, your new instance will appear in the Instances list and ready for you to use.
Set up Ports for Connectivity
This is a crucial step to ensure your server operates normally. By default, your newly created Instance will have all its ports closed. You need to open certain ports so that you and your visitors can connect to the server.
To open ports, follow these steps:
Go to Instances → Click on your Instance → Switch to Networking tab → Click on the item in the Subnet row → Then switch to Security tab → Click on the item inside the Security Lists → Then switch to Security rules tab.
From there, in the Ingress Rules section, press Add Ingress Rules button:
- Stateless:
ENABLE - Source Type:
CIDR - Source CIDR:
0.0.0.0/0 - IP Protocol:
TCP - Destination Port Range:
22,443
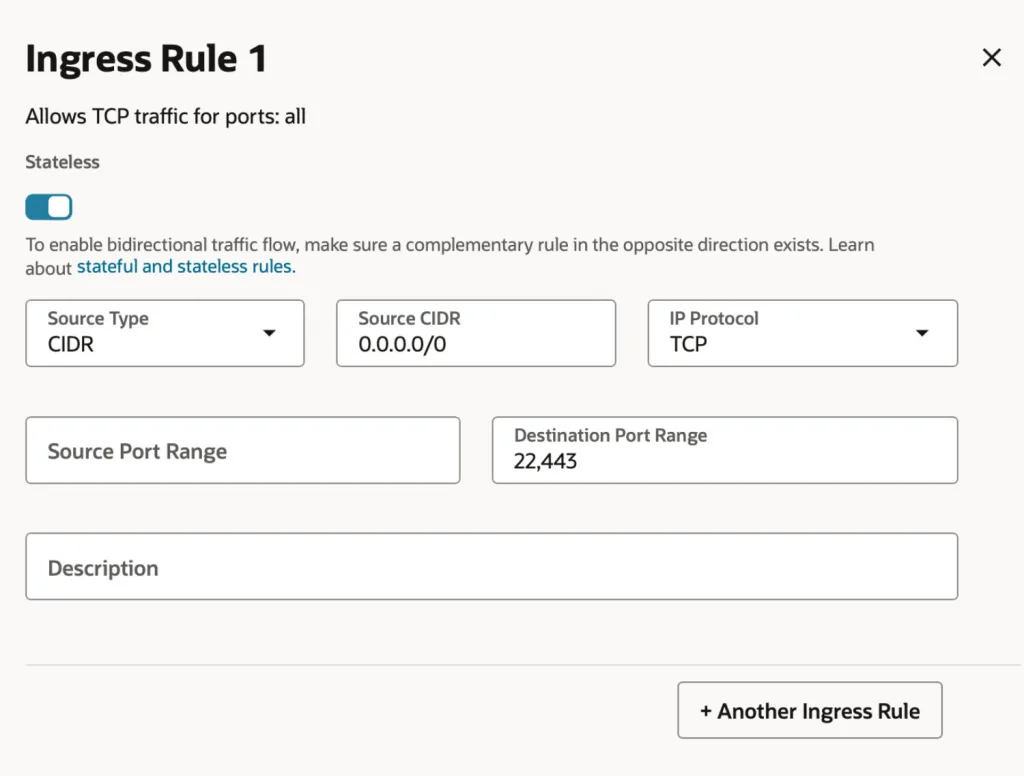
This configuration opens port 22 for SSH and port 443 for HTTPS. If you also need to allow HTTP traffic (port 80), set the port range to 22,80,443.
Click the Add Ingress Rules button at the bottom right to complete the setup. Your server will then be ready to accept these types of connections.
Done.